
Learn how to make this rich, creamy sweetened condensed milk recipe at home with just two ingredients! This versatile DIY pantry staple is perfect for Caribbean desserts, coffee, tea, and baking. Use it to create a super creamy base for mango ice cream or to add a luxurious depth to Jamaican rum cream, bringing authentic, preservative-free flavor to your treats. Whether you’re a seasoned cook or just starting, this recipe is customizable and easily adaptable for vegan diets, making it a must-have addition to your homemade repertoire.

What is Sweetened Condensed Milk?
Sweetened condensed milk is a thick, syrupy concentrated milk product. It is made by reducing milk to remove most of its water content. Then it is sweetened with sugar. This combination results in a creamy, rich liquid with a concentrated sweetness and a smooth texture. Typically used in baking, desserts, and beverages, it adds a velvety texture and depth of flavor. Unlike evaporated milk, which is unsweetened, sweetened condensed milk has a high sugar content. This sugar content acts as a preservative, giving it a longer shelf life than regular milk when unopened.

Why This Recipe Works
This homemade sweetened condensed milk recipe is designed to be as foolproof and flavorful as possible, capturing the rich, creamy sweetness that makes it a staple in Caribbean kitchens. Here’s what makes this recipe work so well:
- High-Quality Milk for Creaminess
Using whole milk as the base gives the recipe its signature richness. The fat in the milk adds body and a velvety texture, making it perfect for everything from coffee to Caribbean desserts. If you’re looking for a dairy-free option, coconut milk is an excellent substitute—it offers a hint of tropical flavor while keeping the same creamy consistency. - Sugar as a Natural Preservative and Sweetener
The sugar does double duty here. Not only does it add the classic sweetness that condensed milk is known for, but it also acts as a preservative, helping to extend the milk’s shelf life. By cooking the milk with sugar, we create a slightly caramelized flavor that adds depth, just like in traditional Caribbean recipes. - Low and Slow Cooking for the Perfect Texture
The key to achieving that thick, luscious consistency is patience. By cooking the milk slowly over low heat, you allow the water to evaporate gradually without scorching. This method ensures a smooth, concentrated result without the risk of curdling or burning. Using a heavy-bottomed pan also helps distribute heat evenly, which is crucial for achieving the ideal texture. - A Simple Reduction Hack
To help you track the reduction process, this recipe includes a handy trick: marking the initial and halfway levels on your spoon or pot. This simple step keeps you from constantly guessing if the milk is ready, ensuring you reach that perfect thickness every time. - Versatility for Personalization
One of the best parts about this recipe is how adaptable it is. You can easily adjust the sweetness level or even add a pinch of salt for balance. Whether you’re using it for desserts, drizzling it over fruits, or blending it into drinks, this recipe’s flexibility means it can adapt to your needs—and it’s preservative-free, so you know exactly what’s in it.
Recipe Breakdown
Here’s how this recipe stacks up—my thoughts on flavor, texture, ease, and more!
FLAVOR: Rich, sweet, and indulgent—perfect for desserts, coffee, or even a spoonful. The sugar complements the creamy milk beautifully.
TEXTURE: Silky smooth and luscious, coating the back of a spoon with a delightful richness.
EASE: Simple but requires patience; the slow simmering process is worth it for that dreamy, thick result.
PROS: No preservatives, customizable sweetness, and creaminess.
CONS: Simmering takes time but yields the signature texture.
REPEAT WORTHY: Absolutely! It’s versatile for desserts, coffee, or new recipe experiments. You’ll come back to this one often.
Why You’ll Love This Recipe

What Makes This Recipe Special
Sweetened condensed milk was a breakfast essential growing up, adding a creamy, luxurious touch to morning porridge, tea, or a simple drizzle over a slice of hard-dough bread—a taste of pure heaven (if you know, you know!). Those small, comforting indulgences were unforgettable, and that memory inspired me to recreate it here.
This homemade version brings back that cozy taste of home, whether drizzled over bread or stirred into a warm drink. With just two ingredients, it’s incredibly easy to make, adding a touch of homemade magic to any dish for both beginners and seasoned cooks.
Explore More DIY Pantry Staples

What I’ve Learned Through Trial and Error
Low and Slow Simmering for Perfect Texture
Developing this recipe took some trial and error, especially when it came to perfecting the texture. I quickly learned that the secret to getting that perfectly thick, syrupy consistency is all about low and slow simmering.

Sweetened Condensed Milk: A Brief History
Sweetened condensed milk was invented by American inventor Gail Borden in the 1850s as a way to make milk shelf-stable without refrigeration. Back then, fresh milk spoiled quickly, especially during long journeys or in warmer climates. Borden’s innovative process removed most of the water from milk and added sugar as a preservative, resulting in a rich, sweet, and long-lasting product.
During the American Civil War (1861–1865), sweetened condensed milk became a staple for soldiers because of its long shelf life and nutritional benefits. After the war, its popularity grew worldwide, particularly in regions without reliable refrigeration. Today, sweetened condensed milk is treasured in many cuisines, valued for its versatility and its ability to add creamy sweetness to both traditional and modern dishes.
Is Condensed Milk the same as Sweetened Condensed Milk?
No, they’re not the same! Although these terms are often used interchangeably, there’s a key difference between sweetened condensed milk and evaporated milk. Growing up, we often referred to sweetened condensed milk simply as “condensed milk,” while evaporated milk was known by its full name.
What’s the Difference?
- Sugar Content and Preservation: Sweetened condensed milk is created by removing about 60% of the water from milk and adding sugar, which acts as a natural preservative. This additional sugar gives sweetened condensed milk its thick, syrupy consistency and longer shelf life. Evaporated milk, on the other hand, undergoes a similar water-removal process but without any added sugar. This gives it a more subtle, creamy flavor, closer to regular milk.
- Color and Texture Differences: Due to its sugar content, sweetened condensed milk is often lighter and richer in color. In contrast, evaporated milk can have a slightly tan or caramelized color due to the concentration of lactose and protein. This deeper color results from the higher heat used in processing, which adds a mild toasty flavor that complements savory recipes.
To avoid confusion, remember: evaporated milk is sometimes labeled as “unsweetened condensed milk” in some regions. When a recipe calls for a sugary, thick milk, sweetened condensed milk is your go-to; for a creamier, more neutral option, reach for evaporated milk.
Can I Make Sweetened Condensed Milk with 2% or Skim Milk?
Yes! While whole milk gives the creamiest result, you can use 2% milk for a lighter texture and skim milk for an even lighter, low-fat option. However, using 2% or skim milk will result in a thinner, less rich condensed milk.
Pro Tip: For extra creaminess, try adding a small amount of butter or a splash of cream during the simmering process. This trick can help mimic the richness of whole milk.
How Can I Prevent My Sweetened Condensed Milk from Curdling?
To prevent curdling, cook the milk and sugar over low to medium heat, stirring frequently to keep it smooth. Avoid boiling, and consider adding a pinch of baking soda at the start to stabilize the proteins. This patience and gentle heat approach will help you achieve a perfectly creamy result!

Step-by-Step Guide: Making Sweetened Condensed Milk at Home
- Combine Ingredients: Add milk and sugar to a heavy-bottomed saucepan. For a slightly richer color, add a pinch of baking soda at this stage, or wait until the milk thickens to incorporate it for a different depth of flavor.
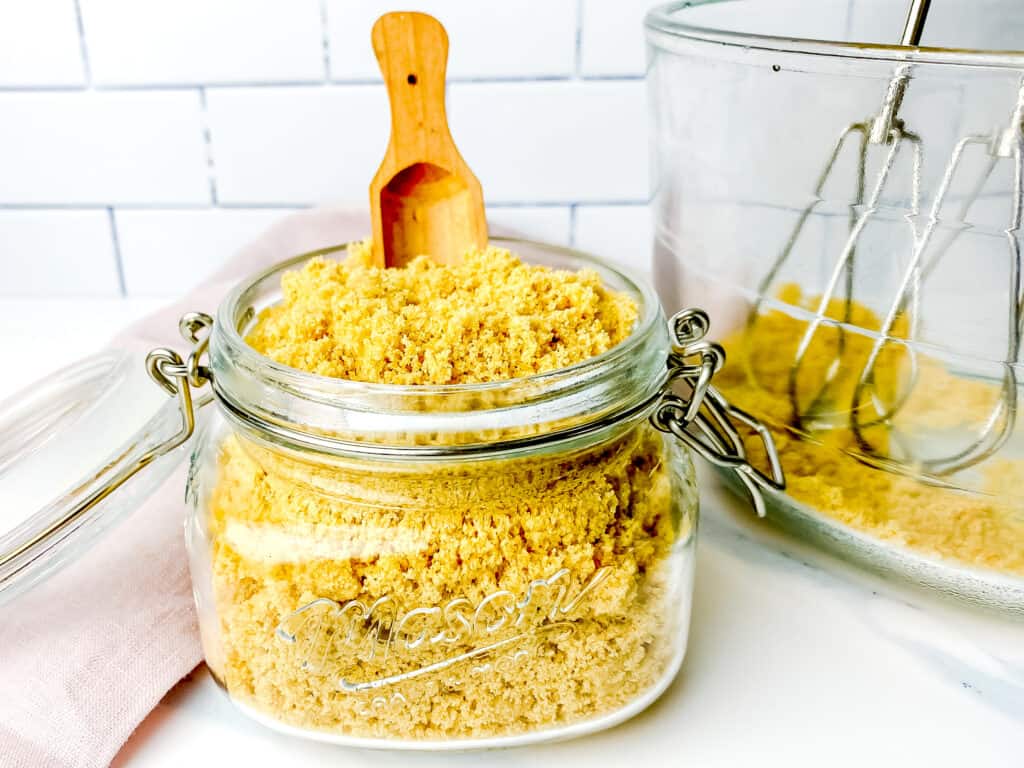
- Reduction Hack: Use a wooden spoon handle to gauge reduction. Mark the initial milk level on the handle, then mark halfway down to know when the milk has reduced by half, achieving the ideal thickness.
- Simmer and Stir: Place over medium heat, stirring frequently to dissolve sugar fully and prevent burning. Once it reaches a gentle simmer, reduce the heat and let it thicken slowly. As it simmers, the color deepens, and the texture becomes syrupy.
- Optional Add-ins: Towards the end, add a small amount of butter for extra creaminess. Once the milk coats the back of a spoon, add vanilla extract and baking soda (if not added earlier) to enhance flavor.
- Strain for Smoothness: If you notice any texture inconsistencies, pour the warm condensed milk through a fine mesh strainer or cheesecloth into a clean container. This will help remove any impurities or undissolved sugar for a smooth, velvety finish.
- Cool and Store: Allow the condensed milk to cool completely before transferring it to a storage container.
Need the full recipe details? Scroll down to the recipe card for ingredients, exact measurements, and easy step-by-step instructions. If you prefer a visual guide, you can watch the recipe video below. You can also find it within the recipe card to follow along and ensure success at every step!
Watch the Step-by-Step Sweetened Condensed Milk Recipe Tutorial
Get instant notifications when we release a new recipe video! Subscribe now and never miss a future release!
Ingredients Breakdown
Key Ingredients for Making Sweetened Condensed Milk at Home
- Whole milk – Whole milk is recommended for the creamiest, richest result, but if needed, 2% or even skim milk can be used with adjustments. Lower-fat options may yield a lighter texture, so consider adding a bit of butter or cream to mimic whole milk’s creaminess. You can swap it for coconut milk or almond milk if you’re looking for a dairy-free or vegan option.
- Granulated Sugar – The key to thickening the milk and adding that signature sweetness, granulated sugar also helps create the smooth texture we love. For added depth of flavor, try coconut sugar, brown sugar, or maple syrup.
- Baking soda – Adding a small amount of baking soda stabilizes milk proteins, helping to prevent curdling during simmering and giving the mixture a slightly smoother texture.
- Butter (optional) – Incorporating butter creates an even creamier finish. If you’re making a vegan version, you can omit it or use a plant-based alternative like coconut oil.
- Vanilla extract (optional) – This optional ingredient adds a warm, flavorful note that enhances the overall taste. Swap it with other extracts like almond or coconut, or omit it for a purely creamy flavor.

Recipe Tips and Troubleshooting
Top Tips for Best Results
Avoid scorching: Always use a heavy-bottomed pot to ensure even heating and avoid burning the milk
Stir frequently: This helps prevent the milk from sticking to the bottom and ensures a smooth consistency.
Patience is key: Don’t rush the simmering process by turning up the heat. Takes time for the milk to reduce properly.
Reduction Hack: Before you start, use a wooden spoon or other utensil to mark the starting level of milk in your saucepan. Dip the handle into the milk until it just touches the surface. Note where the milk reaches, and mark this level with a piece of tape, pencil, or by taking a mental note. Now, mark a second point halfway down the handle—this is your target. This quick trick allows you to check the milk’s reduction at a glance, helping you reach the ideal thick and creamy consistency.
For an extra creamy texture, you can add a pinch of baking soda to the milk and sugar mixture. Do this either before simmering or after it thickens. This helps to neutralize acidity, reducing the risk of curdling and enhancing the richness.
Strain While Warm: Straining while the milk is warm helps it pass easily through the mesh, ensuring a smoother result.
Extra Creaminess: Use a cheesecloth over the mesh for additional filtration if you want a texture that’s even closer to store-bought varieties.
Common Mistakes to Avoid When Making Sweetened Condensed Milk
- Boiling instead of simmering can cause the milk to curdle, ruining the texture.
- Not stirring enough can lead to a grainy finish, so keep that spoon moving!
- Storing while hot is not recommended. Make sure the milk cools completely before storing it to avoid condensation that can affect its shelf life.
- Texture check: The condensed milk is ready when it coats the back of a spoon and doesn’t drip off immediately.
Frequently Asked Questions (FAQs)
Nutritional Information
These nutrition values are approximate and can vary depending on the exact ingredients and brands you use. Use them as a guideline for this recipe.
Total for the Recipe (1 cup / 16 tablespoons):
Calories: 536
Fat: 7.9g
Carbohydrates: 111.7g
Protein: 7.7g
Per Tablespoon Serving
Calories: 33-34
Fat: 0.5g
Carbohydrates: 7g
Protein: 0.5g
The nutritional values may vary depending on the type of milk or sugar substitutes used.
The nutritional information provided on Kerriannskravings.com is an estimate based on available data and is offered as a courtesy. For the most accurate results, please calculate the nutrition using the actual ingredients and quantities used in your recipe. For more details, see our full Nutritional Disclaimer.
Substitutions and Variations
Absolutely! To make vegan sweetened condensed milk, simply replace the whole milk with coconut or almond milk. Coconut milk provides a creamier texture with a subtle coconut flavor, while almond milk offers a lighter alternative. Both options create a delicious, dairy-free substitute for traditional condensed milk.
For a dairy-free version, coconut milk works wonderfully, bringing a natural creaminess and mild tropical flavor that pairs well with Caribbean-inspired recipes. Almond or oat milk also work as alternatives but may result in a slightly thinner consistency. Each option provides a unique taste, making this an adaptable recipe for anyone with dairy sensitivities or preferences.
To elevate the taste of your sweetened condensed milk, try adding a teaspoon of vanilla extract for warmth or a pinch of cinnamon for subtle spiciness. These small additions infuse extra depth and create a cozy, complex flavor profile that pairs wonderfully in desserts and beverages.
Yes, alternative sugars work well! Maple syrup or agave syrup can replace granulated sugar for a refined sugar-free option. Keep in mind, each brings a unique flavor and slightly different sweetness level, so experiment to find your preferred taste and texture.
Yes, evaporated milk can be substituted for whole milk. To make it comparable to fresh whole milk, dilute it with an equal amount of water (for example, mix 1 cup of evaporated milk with 1 cup of water to make 2 cups of milk). This substitute is especially useful if you’re out of fresh milk but want to maintain a similar consistency in your recipe.
Add about 1 to 1¼ cups of sugar for every cup of evaporated milk. Gently heat the mixture until the sugar completely dissolves, then let it cool. This will create a homemade sweetened condensed milk with a similar sweetness and texture to the store-bought version.
Yes! Reconstituted milk powder is a great substitute for whole milk in this recipe. Follow the package instructions to mix the right amount of water with the powder to create the volume of whole milk needed. This will give you a similar texture and flavor, perfect for homemade sweetened condensed milk.
Yes! Whole milk is ideal for creaminess, but 2% milk can create a slightly lighter version, and skim milk will yield an even lighter, lower-fat result. Expect a thinner texture and less richness with these options.
Pro tip: To boost the richness, add a small amount of butter or a splash of cream during simmering, which brings the texture closer to that of whole milk-based condensed milk.
Yes, homemade sweetened condensed milk can replace the store-bought version in any recipe. It delivers the same creamy sweetness, so you won’t miss a thing!
Tip: If your homemade condensed milk turns out slightly thicker than expected, simply add a splash of milk to achieve the desired consistency. This DIY version is as versatile as store-bought, so feel free to adjust it to perfectly suit your recipe.
Brown Sugar: Adds a molasses-like flavor and a darker color.
Coconut Sugar: Provides a subtle caramel taste with a light brown hue.
Maple Sugar: Delivers a unique maple flavor, perfect for desserts.
Honey or Agave Syrup: Can be used but may yield a thinner consistency and alter the flavor.Note: Using different sweeteners can impact both the texture and sweetness of the condensed milk. Adjust proportions as needed to achieve your preferred result.
Tip: Keep in mind that using different sweeteners can change both the texture and sweetness of your condensed milk. When experimenting, start with a small batch and adjust proportions as needed until you’re satisfied with the flavor and consistency before scaling up.
While sweetened condensed milk won’t whip up into stiff peaks like heavy cream, it can be whipped to a light, airy texture. Whipping adds a fluffy, smooth consistency that works beautifully as a topping for desserts, a swirl in coffee, or even as a decadent filling for pastries. For an even creamier result, try blending it with a touch of heavy cream or a dollop of cream cheese. This variation brings a bit of extra indulgence to your favorite treats!
Scaling the Recipe
This 2-ingredient condensed milk recipe scales easily to fit your needs. You can make a smaller batch or enough for multiple desserts.
Original Recipe (Yields about 1 cup):
2 cups whole milk
1 cup granulated sugar
Doubling the Recipe (Yields about 2 cups):
4 cups whole milk
2 cups granulated sugar
Halving the Recipe (Yields about 1/2 cup):
1 cup whole milk
1/2 cup granulated sugar
Triple the Recipe (Yields about 3 cups):
6 cups whole milk
3 cups granulated sugar
Important Tips When Scaling this Recipe:
Simmer Time: The larger the batch, the longer it may take to reduce and thicken properly. Keep an eye on the consistency and continue simmering until the liquid has reduced by half, no matter how much you’re making.
Pot Size: Use a large enough pot when scaling up to prevent boiling over and ensure even heating throughout.
Stirring: Stirring often is crucial. It helps to avoid burning the milk at the bottom of the pot.
Simple Scaling Ratio: For each 1 cup of milk, use 1/2 cup of sugar. This ratio makes it easy to adjust the recipe to fit your needs.
Note on Simmering Time: Larger batches may require slightly more simmering time. Be patient and let the mixture reduce by half. Stir often to avoid scorching.
For an even easier way to scale the recipe, simply use the recipe card below! Adjust the serving size, and the card will automatically recalculate the ingredient amounts for you. Whether you’re doubling or halving the recipe, it does the math so you can focus on making the perfect batch. While the card won’t adjust cooking times, it makes scaling the ingredients hassle-free.
Storing and Freezing Instructions
In the Fridge: Allow the condensed milk to cool to room temperature, then transfer it to an airtight container and refrigerate for up to one week. Cooling it first helps prevent condensation that can affect its texture.
Freezing: For longer storage, pour the condensed milk into an ice cube tray, freeze, and then transfer the cubes to a labeled freezer bag with the date. This makes it easy to defrost only what you need. Alternatively, if using a different freezer-safe container, leave about 1/2 inch of space at the top to allow for expansion. When ready to use, thaw in the fridge overnight and stir well to restore its creamy texture. Frozen sweetened condensed milk keeps for up to 3 months.
Shelf Life: Since this homemade version lacks preservatives, it has a shorter shelf life than store-bought varieties.
Homemade sweetened condensed milk lasts around a week because it lacks the preservatives and sterilization found in store-bought options. While sugar serves as a natural preservative by reducing water activity, homemade versions doesn’t benefit from commercial processing, which helps extend shelf life. For the best flavor and safety, store your homemade condensed milk in an airtight container in the fridge and plan to use it within 5–7 days.
Serving Suggestions and Pairings
In Beverages: Add it to coffee, tea, Jamaican hot cocoa, or use it as a creamy base for homemade Jamaican rum cream.
For Desserts: Perfect for no-churn ice cream, drizzling over fresh fruit, or adding to baked goods like pies and cakes.
On Breakfasts: Top pancakes, waffles, or French toast for a decadent start to the day.
In Porridge: Stir into cornmeal porridge for extra sweetness and creaminess.
Make Dulce de Leche: Simmer longer to transform it into a caramel-like dulce de leche, ideal for spreading or dipping.
More Commonly Asked Questions
Homemade sweetened condensed milk will stay fresh for up to 1 week when stored in an airtight container in the fridge. For longer storage, you can freeze it for up to 3 months. Be sure to thaw it overnight in the fridge and stir well to restore its creamy texture before using.
If your homemade sweetened condensed milk isn’t reaching the desired thickness, there are a few possible reasons:
Reduced Sugar Content: Sugar isn’t just for sweetness; it also helps with thickening. If you’ve reduced the sugar in the recipe, you may need to add a thickening agent like a tiny pinch of xanthan gum or a teaspoon of cornstarch. Dissolve cornstarch in a bit of water to avoid lumps, then add it to the mixture while heating. Be careful with xanthan gum, as a small amount goes a long way.
Simmering Time: Condensed milk thickens as it reduces. If it’s still too thin, allow it to simmer longer over low heat, stirring frequently. A wooden spoon reduction hack (as outlined earlier) can help track when it’s reached the halfway mark.
Temperature and Timing of Additions: Adding ingredients like sugar and cornstarch gradually can help control thickness without risking a burnt or grainy texture. Start with about a quarter of the sugar, then add more as needed, stirring constantly.
Cooling Effect: Condensed milk may appear thinner when hot and thicken as it cools. If the texture looks off, let it sit for a bit after cooking to reach its final consistency.
A grainy texture often results from undissolved sugar. To avoid this, stir continuously during the simmering process to help the sugar fully dissolve. Keeping the heat low and consistent also prevents the mixture from overheating, which can cause crystallization and graininess.
Yes, raw milk can be used to make homemade sweetened condensed milk. However, it’s important to heat the milk to reduce any potential bacteria, as raw milk hasn’t been pasteurized. This extra step is especially recommended since homemade condensed milk doesn’t undergo further commercial sterilization.
Raw milk may impart a slightly richer, creamier taste to condensed milk, which some people prefer, but using it also requires additional caution and handling.
Adding a pinch of baking soda to your sweetened condensed milk can enhance its creaminess and stability. This optional step raises the pH slightly, which helps the milk proteins stay smooth and prevents curdling. It can also deepen the color and flavor, giving the condensed milk a richer, caramel-like note. You can add the baking soda either before you start simmering or after the mixture has thickened. Each timing offers unique benefits, so feel free to choose the method that best suits your taste and texture preference.
Adding a pinch of baking soda to your homemade sweetened condensed milk can improve its creaminess and stability. This optional step slightly raises the pH, helping to keep milk proteins smooth and reducing the risk of curdling during simmering. Additionally, baking soda can enhance the color and deepen the flavor, creating a richer, caramel-like taste. You can add it either before simmering or after the mixture has thickened—each option offers unique benefits for both texture and taste, so choose based on your preference.
No, evaporated milk is unsweetened and less concentrated than sweetened condensed milk.
No, they’re different. Sweetened condensed milk contains added sugar, making it thick and sweet.
Evaporated milk(often called unsweetened condensed milk) has no added sugar and is less thick.
Evaporated Milk: About 60% of water is removed, with no added sugar.
Sweetened Condensed Milk: Reduced water content and added sugar for a thick, sweet consistency.
Stick with “evaporated milk” for the unsweetened type and “sweetened condensed milk” for the sugary version.
Adding lemon juice to sweetened condensed milk in recipes is typically done to help thicken and slightly acidify the mixture. The acidity in lemon juice reacts with milk proteins, encouraging them to coagulate, which creates a creamier, firmer texture. This technique is especially common in recipes like key lime or lemon pies, where it helps achieve a custard-like consistency without baking. The slight tang from the lemon juice also complements the rich sweetness of the condensed milk, balancing the flavors.
Yes, sweetened condensed milk can be frozen! Transfer it to an airtight container, leaving space for expansion. It will keep in the freezer for up to 3 months. To use, simply thaw in the fridge overnight. Note that freezing may slightly alter the texture, so it’s best suited for recipes rather than direct toppings.
Boiling sweetened condensed milk creates a rich caramel-like treat called dulce de leche. By slowly heating a sealed can of sweetened condensed milk, the sugars caramelize, thickening the milk into a smooth, golden sauce. To make it safely, place the unopened can in a pot of water, keeping it fully submerged, and simmer for 2-3 hours. Be sure to let the can cool completely before opening to prevent burns. This method is a simple, hands-off way to enjoy homemade caramel!
In this homemade recipe, the ratio is 2 cups of whole milk to 1 cup of granulated sugar. This balance helps the milk reduce and thicken to the signature sweetened condensed consistency, while the sugar adds rich sweetness and a syrupy texture. If you’d like to experiment with flavors, try substituting granulated sugar with raw cane or coconut sugar for a unique twist.

Craving More?
Check out my Pantry Staples collection for more DIY kitchen staples to level up your cooking game.


Never Miss a Recipe!
Join the Cravings Community for the Latest Recipes, Tips, and More Delivered Straight to Your Inbox.
Tried this recipe? We’d love your feedback!
If you tried this recipe, let us know how it turned out in the comments below! Feel free to share your photos and tag us #kerriannskravings. We’d love to see your version and share it with our community! —you might inspire the next home cook to try it out!
Sweetened Condensed Milk Recipe
With just two ingredients, this DIY Sweetened Condensed Milk recipe is a cost-effective alternative to store-bought options. Ready in less than an hour, it’s ideal for elevating desserts, coffee, or classic Caribbean recipes like my Homemade Jamaican Rum Cream. A must-have pantry staple!
1
cup10
minutes40
minutes34
kcal1
tablespoon16
tablespoons50
minutesKeeps your device screen on while following the recipe, so you don't have to keep unlocking your phone while cooking.
Ingredients You’ll Need
2 cups whole milk, 2% or skim milk (substitute with full-fat coconut milk for a dairy-free option)
1 cup granulated sugar (you can also use raw cane sugar or coconut sugar for a different flavor profile)
1/8 teaspoon baking soda (a pinch, optional but recommended)
2 tablespoons butter (optional, for a creamier texture; use dairy-free margarine for a vegan version)
1/2 teaspoon vanilla extract (optional, for added flavor)
Step-by-Step Guide
- Prepare the Milk Base: In a medium saucepan, combine 2 cups of whole milk and 1 cup of granulated sugar. Stir over medium heat until the sugar fully dissolves. Stirring consistently helps prevent burning and sticking. At this stage, the mixture should be thin and pale. Optional for Smoother Consistency: Add a tiny pinch of baking soda to stabilize the milk proteins, which reduces curdling and enhances smoothness. This may also add a subtle golden tone.
- For Dairy-Free Version: If using coconut milk, follow the same steps. Coconut milk provides a rich, tropical flavor that complements Caribbean-inspired desserts beautifully.
- Reduction Hack: Reduction Hack: Before you start, use a wooden spoon or other utensil to mark the starting level of milk in your saucepan. Dip the handle into the milk until it just touches the surface. Note where the milk reaches, and mark this level with a piece of tape, pencil, or by taking a mental note. Now, mark a second point halfway down the handle—this is your target. This quick trick allows you to check the milk’s reduction at a glance, helping you reach the ideal thick and creamy consistency.
- Simmer the Mixture: Once the sugar has dissolved, reduce heat to low and let the mixture simmer gently. Small bubbles should form around the edges as the color gradually deepens. Stir occasionally to prevent a skin from forming. Simmering Tip: This process takes about 35-40 minutes. Avoid increasing the heat to speed things up, as this can lead to curdling.
- Thicken the Sweetened Condensed Milk: After about 30-35 minutes, the mixture should reduce by half, turning a light golden color and achieving a syrupy consistency that coats the back of a spoon.
- Add Butter (Optional): For added creaminess, stir in the butter until fully melted and incorporated.
- Add Vanilla (Optional): Stir in the vanilla extract at the end for additional flavor.
- Strain for Extra Smoothness (Optional): If you notice any undissolved sugar or tiny particles, pour the warm condensed milk through a fine mesh strainer into a clean container. This will help ensure a smooth, creamy texture that’s ideal for desserts and drinks.
- Cool and Store: Remove from heat and let cool slightly before transferring to an airtight container. Storage Tip: The condensed milk will thicken as it cools. Refrigerate for up to 2 weeks.
- Freezing: For extended storage, pour the condensed milk into an ice cube tray to freeze in convenient portions. Once frozen, pop the cubes out and transfer them to a labeled freezer bag with the date marked on it. This method makes it easy to grab just the amount you need without defrosting the entire batch. Alternatively, if you’re using a different freezer-safe container, make sure to leave about 1/2 inch of space at the top to allow for expansion as it freezes. Thaw the desired portion in the fridge overnight and stir well before use to restore its creamy texture.
Watch the Recipe in Action
Top Tips for Best Results
- Avoid scorching: Always use a heavy-bottomed pot to ensure even heating and avoid burning the milk.
- Stir frequently: This helps prevent the milk from sticking to the bottom and ensures a smooth consistency.
- Patience is key: Don’t rush the simmering process by turning up the heat. Takes time for the milk to reduce properly.
- Boiling instead of simmering: This can cause the milk to curdle, ruining the texture.
- Reduction Hack: Reduction Hack: Before you start, use a wooden spoon or other utensil to mark the starting level of milk in your saucepan. Dip the handle into the milk until it just touches the surface. Note where the milk reaches, and mark this level with a piece of tape, pencil, or by taking a mental note. Now, mark a second point halfway down the handle—this is your target. This quick trick allows you to check the milk’s reduction at a glance, helping you reach the ideal thick and creamy consistency.
- For an extra creamy texture, you can add a pinch of baking soda to the milk and sugar mixture. Do this either before simmering or after it thickens. This helps to neutralize acidity, reducing the risk of curdling and enhancing the richness.
- Strain While Warm: Straining while the milk is warm helps it pass easily through the mesh, ensuring a smoother result.
Extra Creaminess: Use a cheesecloth over the mesh for additional filtration if you want a texture that’s even closer to store-bought varieties.- Not stirring enough: This can lead to a grainy finish, so keep that spoon moving!
- Storing while hot: Ensure the milk cools completely before storing to avoid condensation affecting its shelf life.
- Texture check: The condensed milk is ready when it coats the back of a spoon and doesn’t drip off immediately.
- Recipe Read-Through: Take a few moments to read through the recipe from start to finish before beginning. This ensures you’re aware of each step and ingredient, helping you avoid surprises during the process. It’s also helpful to gather your ingredients and equipment beforehand for smooth and efficient cooking.
- Mise en Place: Proper preparation, also known as ‘mise en place,’ is the key to cooking success. Gather all your ingredients and tools before you start. This avoids forgetting key steps and allows you to focus entirely on the cooking process. This method saves time, reduces frustration, and ensures a better outcome.
- Oven Calibration: Make sure to calibrate your oven regularly to ensure your recipes turn out as expected. Oven temperatures can become inaccurate over time, affecting your cooking. Check your oven’s accuracy every few months for the best results.
- Shop Ingredients & Tools: To make grocery shopping easier, you can generate a shopping list of all the ingredients. This can be done with just one click. Use the button below the ingredients list to get everything you need through Instacart. You can also scroll down to see the handpicked tools and equipment links. These are perfect for ensuring you’re fully prepped for this recipe!
- High-Altitude Adjustments: At higher altitudes, lower air pressure affects baking and cooking times. To adjust, slightly increase your oven temperature by 15-25°F and reduce baking times by a few minutes. You may need to decrease sugar. Also, reduce leavening agents like baking powder while adding a little extra liquid to prevent dryness. Check your recipe often to avoid overcooking. For more details on high-altitude adjustments, refer to this guide on High-Elevation Food Preparation. You can also check King Arthur’s high-altitude baking tips for expert advice.
Nutritional Information
16 servings per container
Serving Size1 tablespoon
Calories34
- Amount Per Serving% Daily Value *
- Total Fat
0.5g
0%
- Amount Per Serving% Daily Value *
- Total Carbohydrate
7g
3%
- Protein 0.5g 0%
* The % Daily Value tells you how much a nutrient in a serving of food contributes to a daily diet. 2,000 calories a day is used for general nutrition advice.
The nutritional information provided on Kerriannskravings.com is an estimate based on available data and is offered as a courtesy. For the most accurate results, please calculate the nutrition using the actual ingredients and quantities used in your recipe. For more details, see our full Nutritional Disclaimer.
Tools You’ll Use
Here are the essential tools and ingredients that will help you create this recipe with ease. Click on any of the links below to grab them and make your cooking experience even smoother!
 Buy Now →
  Buy Now →
Thai Kitchen Unsweetened Coconut Milk
Buy Now → Buy Now →
Fine mesh Strainer (3 piece set)
Buy Now →
Lodge 6 Quart Enameled Cast Iron Dutch Oven
Buy Now → Buy Now →
  Buy Now →
  Buy Now →
  Buy Now →
  Buy Now →


